Friday, April 23, 2010

A garden poem for morning!

Mid springtime skies of blue delight,

With wispy clouds of cotton light.

Sweet silky air against my cheek,

On garden walk…I take first peek.

I meet the fragrance of the day,

With smiles that come and dare to stay.

Amusing birds and butterfly,

Caressing flowers, then, flutter by.

Watching morning’s diamond dew,

The bees that gather quickly flew,

From stem to bloom and back again,

Gathering nectar in nature’s plan.

So with peaceful loving grace,

I walk among the Queen Anne’s lace

Knowing angels guided me.

To garden paths with giggling glee.

This journey is the best so far,

When guided by bright morning star.

Perhaps I’ll run through sprinklers cool.

Eat ice cream that would make you drool.

Soon summer’s choir will sing and play.

Before the ice and snow can stay.

Enjoy the day and join me now,

While gardens takes a joyous bow.

Come with me to pull the weeds,

Please leave the plants that shed their seeds.

You who walk amongst my garden,

Share leisure’s sudden loving pardon…

Feel free to come and go and take

Bouquets to share, a squash to bake.

For in my garden’s splendid reaping,

Is love to give and love for keeping.

Wednesday, April 21, 2010

Growing peonies!

Of all the favorite spring blooms, nothing is so wonderful as peonies bursting into color from the beautiful perfectly round buds amidst the lacy leaves. Last spring while dog sitting for the Idaho kids, their driveway was lined with peonies and they showed off for me, laden with blossoms that sent their fragrance all the way up to the house. I could not resist bringing a bouquet into the house and then getting out my paints. One thing always leads to another!

Peonies are perennial favorites in the flower garden. Few herbaceous plants can rival them for floral display and foliage. Their exquisite, large blossoms, often fragrant, make excellent cut flowers and the foliage provides a background for annuals or other perennials. Two types of peonies are generally grown in the home landscape, Paeonia spp. hybrids (garden peony) and Paeonia suffruticosa (tree peony).

Peonies grow from two to four feet in height. Support is often required for tall, double hybrids. Peonies thrive in sunny locations and well-drained soils, tolerating a wide range of soil types. Best growth is in soil with a pH range of 6.5 to 7.5, deep and rich in organic matter. They are hardy from zone 8 to zone 2, with some exceptions.

Planting, transplanting and dividing peonies are best done in early fall but may be done in spring as soon as soils are workable. Each plant requires an area about three feet in diameter. Dig a generous hole, large enough to accommodate the roots and incorporate aged organic matter in the bottom. Place the peony in the prepared hole so that the eyes (small, red-colored buds) are one to two inches below the soil's surface. Backfill and water well.

Peonies may be left undisturbed for many years. A decline in flower production usually indicates overcrowding and the need for division. Carefully lift the clump and wash away the soil to expose the eyes. Using a clean, sharp tool, divide the clump into sections, each with three to five eyes and good roots. Replant immediately.

SPRING CARE: Start cultivation early. Feed Fertilizer soon after growth starts, using 1 rounded tablespoonful around each plant and cultivating it into the soil. The feeding is important since the peony plant makes a very rapid early growth and needs this complete feeding to produce foliage and blooms. For larger blooms, disbud the smaller buds on the plant, allowing only the terminal bud to develop. For quantity of flowers and a longer flowering season, leave some of the lateral buds. From white, creamy pink, raspberry to deep maroon, peonies come in many colors.

Paeonia Raspberry Sundae


Wednesday, April 14, 2010

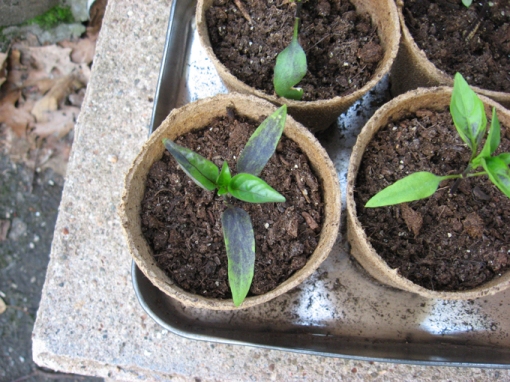
Transplanting seedlings from flats to peat pots.

[Digging Out Seedlings]

img_4278


One of the most common mistakes made is leaving the seedlings in the seed flat too long. The ideal time to transplant young seedlings to individual pots is when they are small and there is little danger from setback. This is usually about the time the first true leaves appear above or between the cotyledon leaves (the cotyledons or seed leaves are the first leaves the seedling produces). Don’t let plants get hard and stunted or tall and leggy. To transplant, carefully dig up the small plants with a knife or wooden plant label. Let the group of seedlings fall apart and pick out individual plants. Gently ease them apart in small groups which will make it easier to separate individual plants. Avoid tearing roots in the process. Handle small seedlings by their leaves, not their delicate stems. Punch a hole in the medium into which the seedling will be planted. Make it deep enough so the seedling can be put at the same depth it was growing in the seed flat. Small plants or slow growers should be placed 1 inch apart and rapid-growing, large seedlings about 2 inches apart. After planting, firm the soil and water gently. Keep newly transplanted seedlings in the shade for a few days, or place them under fluorescent lights. Keep them away from direct heat sources. Continue watering and fertilizing as in the seed flats. Most plants transplant well and can be started indoors, but a few plants are difficult to transplant. These are generally directly seeded outdoors or sown directly into individual containers indoors. Examples include zinnias and cucurbits, such as melons and squash.

There are many types of containers available commercially. Those made out of pressed peat can be purchased in varying sizes. Individual pots or strips of connected pots fit closely together, are inexpensive, and can be planted directly in the garden. When setting out plants grown in peat pots, be sure to cover the pot completely. If the top edge of the peat pot extends above the soil level, it may act as a wick, and draw water away from the soil in the pot. To avoid this, tear off the top lip of the pot and then plant flush with the soil level.

Hardening Plants
Hardening is the process of altering the quality of plant growth to withstand the change in environmental conditions which occurs when plants are transferred from a greenhouse or home to the garden. A severe check in growth may occur if plants produced in the home are planted outdoors without a transition period. Hardening is most critical with early crops, when adverse climatic conditions can be expected. Hardening can be accomplished by gradually lowering temperatures and relative humidity and reducing water. This procedure results in an accumulation of carbohydrates and a thickening of cell walls. A change from a soft, succulent type of growth to a firmer, harder type is desired.

This process should be started at least 2 weeks before planting in the garden. If possible, plants should be moved to a 45o to 50oF temperature indoors or outdoors in a shady location. A cold frame is excellent for this purpose. When put outdoors, plants should be shaded, then gradually moved into sunlight. Each day, gradually increase the length of exposure. Don’t put tender seedlings outdoors on windy days or when temperatures are below 45oF. Reduce the frequency of watering to slow growth, but don’t allow plants to wilt. Even cold-hardy plants will be hurt if exposed to freezing temperatures before they are hardened. After proper hardening, however, they can be planted outdoors and light frosts will not damage them.
The hardening process is intended to slow plant growth. If carried to the extreme of actually stopping plant growth, significant damage can be done to certain crops. For example, cauliflower will make thumb size heads and fail to develop further if hardened too severely. Cucumbers and melons will stop growth if hardened.


Tuesday, April 13, 2010

Early Spring bloomers!


By now your gardening efforts are blooming.....baskets of gold, pansies, tulips, daffodils, candytuft, anemonies, forsythia....and soon iris, lilacs and spirea. Spring has sprung! Enjoy!

Monday, April 12, 2010

Time to plant peas!

Among the cool weather things to plant early, peas are on the list.

pea flower

pea

  1. Choose your type(s). There are three: English or garden peas (only the seeds are eaten), Chinese or snow peas (picked when the pods have reached full size but the seeds are still small and eaten pod and all), and snap peas (picked when both pod and seeds are mature; both are edible).

  2. Sow peas directly in the garden as soon as the soil can be worked, usually about five weeks before the last expected frost. Because the seeds germinate so readily, and because you'll want to make successive plantings, there's no real advantage to buying started plants.

  3. Plant the seeds an inch deep, 3 to 4 inches apart, in rows about 3 feet apart. Install supports for peas - even dwarf varieties - when you plant them, and start guiding the vines upward as soon as they're long enough to climb.

  4. Plant a different, heat-resistant variety a few weeks after the first sowing. Then 8 to 10 weeks before the first frost date, plant a crop in another bed for an early autumn harvest.

  5. Make sure young plants get about 1/2 inch of water a week (1 inch in very sandy soil). When plants begin to flower, they need an inch per week regardless of soil.

  6. Help ensure heavy yields by feeding liquid seaweed or compost tea twice during the growing season.

  7. Expect peas to be ready for picking about three weeks after the plants begin to flower.


Friday, April 9, 2010

Small spaces can yield garden produce!

http://permacultureforrenters.com/wp/wp-content/uploads/2009/05/container-garden.jpg

Just because you don't have a huge garden space or live in a city, it doesn't mean you cannot grow healthy produce for your use. A creative gardener can use a roof top, large containers including garbage cans, or an old rain gutter to plant in.

http://www.growquest.com/container%20gardening/32-635.jpg

Container garden picture of nasturtium in large stone container garden

Vegetable container gardening can bring joy and bounty. The simple pleasure of biting into a tomato still warm from the sun, picked and eaten on the spot, is almost unbeatable. You can grow just about any vegetable in a container garden and you can also save serious bucks by growing your own vegetable container gardens.

However, vegetable container gardening can be a frustrating and expensive endeavor if your plants don't thrive and produce. The following list of basic tips apply to most vegetables, and will help you and your plants get off to a good start.

Sun - Most vegetables need full sun – that means at least six hours of direct sunlight a day. It is easy to overestimate how much sun an area really gets, so either take out your watch and time how long the sun hits the spot where you want to put your vegetable container garden.

Water – Growing vegetables need water - lots of it. However, you don't want to drown your plants. The goal is to keep your soil moist but not wet. To figure out if your plants need water, stick your finger down into the soil, about an inch, or up to your first knuckle. If the soil feels dry, add water, and if you're not sure, wait and check later in the day. At the height of summer, you probably will have to water at least once, sometimes twice, a day. Proper watering may be the single most important and hardest part of vegetable container gardening. A water gauge that goes down to the roots is a good $6 investment.

Heat – If you live in a really hot zone you may have to shade your plants in the middle of the day in order not to fry them. Also, it's best not to use metal containers or dark colored plastics or ceramics, because they can heat up and cook your plant's roots. On the flip side, many vegetables don’t like cold soil, so make sure not to put your vegetable container gardens outside full-time, until you know the temperatures are warm enough. For many plants the soil needs to be at least 60°F. Using a meat thermometer is a good way to find out the temperature of your soil. Always make sure to harden off your plants before you put them outside. That means introduce them gradually to the elements.

Soil - Quality potting soil is really important for vegetables. Don't use soil from your garden, because it will compact in your container and won't drain water properly. Also, one of the reasons to garden in containers is so you won't have to deal with weeds. Chances are pretty good that if you use garden soil, you will be importing weeds into your container. I use organic potting soil because studies have shown that there are many benefits to growing organically, including better taste and a higher percentage of antioxidents and phytochemicals.

Fertilizer - Plants need food to thrive, and their food is fertilizer. If your soil doesn’t have fertilizer already mixed in, you’ll want to add fertilizer. I use an organic granular fertilizer and mix it into my containers from top to bottom. Every couple of weeks I will add diluted liquid fish emulsion or liquid seaweed to give them the nutrition they need. Another great way to add fertilizer during the growing season is to make or buy compost tea.

Drainage - Drainage is key to keep plants from drowning. You want your pot or container to let excess water out of the bottom, so your plants won't sit in water or soggy soil. Make sure your container has one large hole or several smaller ones. You can usually drill holes if the drainage is insufficient. To protect a deck under the pot...put a saucer under the pot to catch the drainage.

Containers – Choosing a container can be daunting. You can use almost anything for a garden planter as long as it is big enough and has good drainage. Keep in mind though, that the larger your container, the easier it will be to maintain. The more soil a container can hold the more moisture it will retain. I don’t bother with containers that are smaller than 12” and I am much happier if they are at least 18”. Bigger, really is better here.

I particularly love wooden containers for growing vegetables. I like the way they look and you can get really good-sized containers that aren’t too expensive, or you can make your own. Cedar will last just about as long as your garden does. Plastic or glazed ceramic containers are fine too. You can even use terracotta, but it is harder to keep your plants moist, because the clay tends to suck the water out of the soil. To help solve this problem, put a dish under your ceramic pot and fill it with water.

Seeds or Seedlings – You can start your veggies from seed or buy seedlings. There are some significant advantages and disadvantages to each. Starting your own seeds is much less expensive than buying seedlings, after some start up costs. If you start your own seeds can grow hard to find varieties and can also grow your seedlings organically. However, starting seeds isn't for everyone. You absolutely cannot let them dry out or they're toast. Conversely, if you give them too much water, they keel over dead. Check out the blog on starting seeds.


Thursday, April 8, 2010

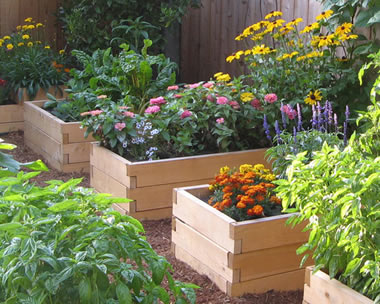
Building a raised bed garden!

Building the garden

If you're a beginner to the raise bed gardening world, laying out the garden in a rectangular pattern is the way to go. Rectangular gardens are easier to maintain and to work on. No matter which design you decide on, make sure to level the area first to make a flat base for starting the project. Other things to keep in mind when you're building a raised bed garden include:

Width and length. If your raised garden bed is accessible from both sides you can make it four feet wide. If the bed is accessible only from one side, limit the width to 3 feet. Most gardeners find it uncomfortable to reach farther than 3 feet to tend the bed. The garden can really be any length suitable to your landscape, but a good workable size is about 12 feet long.

http://www.thetinylife.com/wp-content/uploads/2009/12/raised-garden.jpg

  • Depth. Most plants need at least 6 to 12 inches of rooting zone, so the soil in the raised garden bed should be about 12 inches deep. Beds built higher may need retaining walls with foundations to keep the soil intact. The higher the raised garden, the less bending over for you.
  • Drainage. Place a few inches of small gravel in the bottom of each bed for good drainage.
  • Orientation. A north-south orientation is best for growing low growing crops, allowing direct sunlight to both sides of the beds. Beds that contain taller crops might do better on an east-west axis. When in doubt, just make sure the raised garden bed gets a minimum of 6 hours of sunlight a day and plants don't shade each other.
  • Soil composition. Fill the raised garden beds with a top soil or a good soil mix. Add compost and mix it in. Some sand can be added if desired for drainage purposes. After you plant your seeds, add about three to four inches of mulch. The mulch will break down over time and add nutrients to the soil and keep it loose. Mulch will also help conserve water and cool roots of the plants. You won't have to worry about weed problems if you mulch well.
  • Using a frame

    Although most raised bed gardens are framed, they really don't have to be. Some gardeners simply mound up soil, to make planting flowers or vegetables within area landscaping easier. However, using a frame will help keep the soil in place during heavy rains and keep the raised bed garden looking neat. You can use a variety of materials, so long as whatever you choose is sturdy and long lasting. Here are some framing ideas:

    • Wood. Avoid using pre-treated lumber for bed frames of vegetable gardens. Chemicals can leach out and injure plants. Use pressure-treated lumber, or rot-resistant cedar or redwood.
    • Composite landscape timbers. Some landscape timbers are made to look like weathered wood. They are made from recycled plastic, weather well, are easy to install, and are long lasting.
    • Concrete block or stone. A little pricier than wood, but very long lasting, blocks or stones make excellent raised bed garden frames.
    http://www.donnan.com/images/raised_bed.jpg

    Easy access pathways

    If you're building more than one raised garden bed, leave walkways in between each bed. When deciding on the width of the walkway, keep in mind that plants at the border of your garden will hang over the edge and that you may want to bring a wheel barrow or garden cart in. For foot traffic only, 1-foot wide paths are usually big enough. Also, put something down on the walkway to keep it from getting muddy. You'll need easy access to those beautiful vegetables and flowers you'll be growing!

    http://www.gertens.com/sites/default/files/images/raised%20beds.thumbnail.jpg


    Wednesday, April 7, 2010

    Amanda and Josh's New House Complete With Raised Beds!


    Follow along this summer as Amanda and Josh learn how to garden in these wonderful raised beds already complete with drip irrigation system. Now all they need is Grandpa Steve's handiwork in the form of a potting bench and a load of manure!

    Raised Bed Gardening!

    A popular vegetable garden layout which many home gardeners choose is the raised garden bed. Raised beds are versatile, easy to use, and have many advantages over traditional gardening. For example, a raised bed allows you to easily control your soil mixtures so that you always have the proper soil for your plants. As you can customize the soil mixtures in your raised beds, you can greatly improve soil drainage for your plants. Many gardeners build raised beds just for this reason. Raising your garden bed even eight inches above the existing ground level can greatly improve drainage. I would suggest 12 inches however.

    While one of the most obvious benefits to gardening with raised beds is their adjustable height, raised beds also have numerous other benefits. For example, because raised beds are designed so that you don’t have to actually step into your raised beds for maintenance, you can produce larger quantities of fruits in vegetables in the same amount space that you’d use in a traditional garden plot.

    Garden maintenance is also easy with raised beds. You can quickly and easily remove weeds and control pests in your raised beds. If you use black plastic mulch for weed control, you will use significantly less plastic for your raised beds that in a traditional garden. Moreover, rodents and other pests that like to eat your veggies in a regular garden bed will have difficulty reaching plants in raised beds. Crop rotation is also relatively painless in raised beds, which can help prevent problems with diseases that can form in the soil over time.

    Watering is also easy and more efficient, as you irrigate only where plants are growing and not the walking spaces between your garden rows. Additionally, you can grow your plants closer together, which helps to shade the soil and reduces evaporation. A drip irrigation system is ideal and efficient.

    You can also quickly change soil and plants in your raised beds. For example, using a raised bed makes it very easy to plant annuals in the summer and replace them with bulbs later in the growing season. If you grow vegetables or fruits, raised beds can greatly increase the growing season. Soil actually heats up quicker in raised beds and the addition of a removable plastic frame transforms your raised bed into an instant cold frame.

    Raised beds can also make gardening more creative, as you can use many different kinds of materials to build you beds including beautiful hardwoods, bricks, stones, and recycled materials such as railroad ties.

    Vegetables are normally planted closer together than in the row vegetable garden layout making this is an ideal choice if you only have space for a small vegetable garden. These beds need to be narrow enough so that you do not need to tread on your beds to plant, weed or harvest your veggies. A good width would be 3 to 4 feet, (.9 - 1.2 metres) if you can get at the bed from both sides. You can build raised beds out of recycled wood, bricks, concrete blocks, stones or just pile up the soil on top of the ground. A good depth would be about 8-12 inches (20-30 cm).

    A raised bed will enable the soil to warm quicker so you can plant earlier in the season. It will also improve drainage. Even if you have very poor soil or even a concrete slab (make sure you have a soil depth of 12 inches or 30cm for this situation), a raised bed will allow you transform a barren patch into a bountiful harvest. A raised bed also alleviates the problem of tree roots competing with your veggies for nutrients and water but make sure that any tree will not cast too much shade on the garden beds.

    Tuesday, April 6, 2010

    More potatoes!

    http://www.carolinalive.com/uploadedImages/Shared/Weather/Agriculture/Other_Stories/potatoes.jpg

    Potato Varieties

    There are many different choices for the potato gardener, limited only by personal preference. Listed below are the most common varieties.

    Reds — This kind of potato has reddish skin, white flesh and a lower starch content. They are especially good for roasting. Red varieties are more susceptible to scab, as their skin is generally thinner and they have shallower eyes than brown-skinned potatoes. However, the issue is not serious enough to be a deterrent to planting red potatoes.

    Whites — The most common type of potatoes found on grocery store shelves, white potatoes have pale skin and white flesh. They are good all-purpose potatoes, suitable for just about any dish.

    Yellow — Varieties of yellow potato include Yukon Gold. Yellow potatoes have yellow flesh and are notably good for baking and frying.

    Russet — The classic baking potato, russets have a high starch content (which also makes it great for mashing) and a skin that is a bit thicker and darker than other white potato varieties.

    Many varieties, like fingerling potatoes aren't found in the grocery store but are plentiful in season at Farmer's markets.

    Variety Maturing Comments
    Yukon Gold Early to Mid season Large, yellow-fleshed variety. They are excellent baked, boiled, or mashed. These potatos store well.
    Superior Mid season Good baked, boiled, or mashed. Resistant to potato scab.
    Red Pontiac Late maturing High yields, large round potatoes, easy to grow, stores well.
    Kennebec Late maturing Excellent producer, large potatoes, great for baking or frying, stores well.
    Russet Norkotah Late maturing Excellent baking potato, excellent producer, large potatoes.
    White Rose Early to Mid season Good producer, good for cooking, doesn't store well.
    Russet Mid season Excellent producer, excellent baking potato, large potatoes, excellent for storage.
    Norland Early maturing Red skin, white flesh, excellent when boiled, fried, or mashed, stores well.


    Planting potatoes: Choose a sunny spot with well draining, loose soil, so that the roots and tubers can develop. . Trench Method: A traditional potato planting method involves digging a shallow trench, about 6" deep and placing the seed potatoes in the trench, eyes facing up. You then cover the potatoes with a couple of inches of soil. As the potato plant grows, soil is continually hilled up along the sides of the plants. This keeps the soil around the developing tubers loose and keeps the surface tubers from being exposed to sunlight, which will turn them green and somewhat toxic. Hill soil whenever the plants reach about 4-6" in height. You can stop hilling when the plants begin to flower.

    Maintenance: Potatoes don’t like a particularly rich soil. If you have some organic matter and the pH is good, the potatoes should be happy. What they do rely on is a steady water supply. Water them at least and inch a week.

    HARVESTING - New young potatoes are harvested when peas are ripe or as the potato plants begin to flower. For storage of full sized potatoes harvest them when the vines turn yellow or have died-back.

    STORAGE - Keep them in the dark, in a spot where temperatures are about 40 degrees.


    Monday, April 5, 2010

    Growing potatoes!


    Mom and Dad were master gardeners and Good Friday was always the time to plant potatoes in the garden. The peas were planted about the same time so one of the first dishes made from the harvest from the garden was creamed potatoes and peas.


    Growing Potatoes

    Potatoes require full sun to grow. Because they are aggressively rooting plants, they will produce the best crop when planted in a light, loose, well-drained but moisture retentive loam. Potatoes prefer a slightly acid soil with a
    ph of 5.8 - 6.5 Fortunately, however, Potatoes are very adaptable and will usually produce a respectable crop, even when the soil conditions are less than perfect. Potatoes should be rotated on a 3-year program. This means, you need 3-suitable sites if you want to grow Potatoes every year.

    Potatoes may be planted as soon as the ground can be worked in the early spring, but you must use good judgment. Potato plants will not begin to grow until the soil temperature has reached 45 degrees F. The soil should be evenly moist, but not wet or soggy. If the soil is water logged when you dig, not only will you risk "caking" the soil, your seed Potatoes will probably rot before they even get started. Potatoes can tolerate a light frost, but you should provide some frost-protection for the plants when they are young. This can be a loose covering of straw, or a temporary plastic tent. (Be sure to remove or ventilate the plastic on sunny days!) If you plan to store Potatoes through the winter, you can plant a second crop as late as June 15. Be sure to only use only certified seed Potatoes! Potatoes are susceptible to several serious diseases. Even though the Potatoes you saved from the previous year, or the Potatos you see in the supermarket may appear healthy, they should not be used for your seed. Certified seed Potatoes are disease free, and have been selected to give you the best results with the highest yields. Certified seed Potatoes are available at most quality nurseries and garden centers. There are several different varieties of Potatoes to choose from, each with it's own characteristics and qualities.

    A week or two before your planned potato planting date, set your seed Potatoes somewhere where they will be exposed to some warmth (between 60 and 70 degrees F.) and lots of light. This will induce them to begin sprouting. A day or two before planting, use a sharp, clean knife to slice the larger seed Potatoes into "seeds". Each seed should be approximately 1 1/2-2inches square, and must contain at least 1 or 2 "eyes" or buds. Smaller Potatos may be planted whole. In the next day or so, your 'seed' will form a thick callous over the cuts, which will help to prevent it from rotting once planted. More tomorrow on planting in rows and hills!

    http://missybrandt.files.wordpress.com/2008/04/image.jpg

    Friday, April 2, 2010

    Happy, happy Easter Lilly!


    Lillies in your garden are colorful, fragrant and easy to care for. You can plant your Easter lilly after it is finished blooming and the foilage turns yellow. Lilies provide an easy to grow, colorful addition to your garden and landscape. By choosing a combination of early, mid-season, and late-blooming cultivars, you can have lilies in flower from mid June through mid September. These hardy bulbs require only minimal care. Each has the capacity to grow, eventually, into an large cluster of flowering stems.


    Enchantment Asiatic lily Enchantment, Asiatic Lilly

    Here are some hardy lillies that do well even in a Northern climate.

    Cultivars Type Color Height in Feet Time of Bloom
    Enchantment Asiatic orange 2 - 3 June
    Connecticut King Asiatic yellow 3 - 4 June
    Corsica Asiatic pink 3 June/July
    Crete Asiatic deep pink 3 - 4 June/July
    Dawn Star Asiatic cream 2 - 3 July
    Black Beauty Oriental dark red 5 - 6 July/August
    Journey's End Oriental deep pink 4 - 5 August
    Stargazer Oriental crimson-red 2 - 3 August
    Yellow Ribbons Oriental white/yellow 3 - 5 August
    Casa Blanca Oriental pure white 4 - 5 August/September

    Lily bulbs may be planted in spring or in the fall, usually from mid-September through mid-October. If you find hardy lilies growing in containers, you may add them to your garden throughout the growing season. When buying locally, select firm, plump bulbs with roots attached. Plant them as soon as possible. Bulbs never go completely dormant so they must not dry out before planting. Plant mail order bulbs as soon as possible, also. For best effect, plant lilies in groups of three or five identical bulbs. Space them eight to twelve inches apart, keeping groups three to five feet apart, depending on the vigor and size of the lilies. Plant small lily bulbs two to four inches deep and large bulbs four to six inches deep, measuring from the top of the bulb. Divide and replant large clusters of bulbs every three years or so – or when it seems they are not blooming as well as originally.

    Never plant lilies where standing water collects after heavy rainfall. Well-drained soil is an absolute must or the bulbs will rot. Add lots of organic matter to clay soil to create a raised area with improved drainage. Incorporate organic matter into light, sandy soil also, to help hold onto nutrients and prevent it from drying too rapidly. Before winter, mulch over newly planted bulbs with four to six inches of loose, weed-free compost, leaves, or wood chips. This delays soil freezing and allows roots to continue growing longer. Mulch also insulates the soil against fluctuating temperatures, delaying the emergence of frost-tender shoots in spring. After lillies are established they won't need much protection....just enjoy.