
RAVEN SPEAK - in the San Rafael Swell
11 years ago


With wispy clouds of cotton light.
Sweet silky air against my cheek,
On garden walk…I take first peek.
I meet the fragrance of the day,
With smiles that come and dare to stay.
Amusing birds and butterfly,
Caressing flowers, then, flutter by.
Watching morning’s diamond dew,
The bees that gather quickly flew,
From stem to bloom and back again,
Gathering nectar in nature’s plan.
So with peaceful loving grace,
I walk among the Queen Anne’s lace
Knowing angels guided me.
To garden paths with giggling glee.
This journey is the best so far,
When guided by bright morning star.
Perhaps I’ll run through sprinklers cool.
Eat ice cream that would make you drool.
Soon summer’s choir will sing and play.
Before the ice and snow can stay.
Enjoy the day and join me now,
While gardens takes a joyous bow.
Come with me to pull the weeds,
Please leave the plants that shed their seeds.
You who walk amongst my garden,
Share leisure’s sudden loving pardon…
Feel free to come and go and take
Bouquets to share, a squash to bake.
For in my garden’s splendid reaping,
Is love to give and love for keeping.
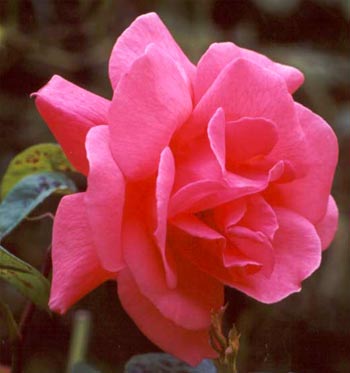
 Of all the favorite spring blooms, nothing is so wonderful as peonies bursting into color from the beautiful perfectly round buds amidst the lacy leaves. Last spring while dog sitting for the Idaho kids, their driveway was lined with peonies and they showed off for me, laden with blossoms that sent their fragrance all the way up to the house. I could not resist bringing a bouquet into the house and then getting out my paints. One thing always leads to another!
Peonies are perennial favorites in the flower garden. Few herbaceous plants can rival them for floral display and foliage. Their exquisite, large blossoms, often fragrant, make excellent cut flowers and the foliage provides a background for annuals or other perennials. Two types of peonies are generally grown in the home landscape, Paeonia spp. hybrids (garden peony) and Paeonia suffruticosa (tree peony).
Peonies grow from two to four feet in height. Support is often required for tall, double hybrids. Peonies thrive in sunny locations and well-drained soils, tolerating a wide range of soil types. Best growth is in soil with a pH range of 6.5 to 7.5, deep and rich in organic matter. They are hardy from zone 8 to zone 2, with some exceptions.
Planting, transplanting and dividing peonies are best done in early fall but may be done in spring as soon as soils are workable. Each plant requires an area about three feet in diameter. Dig a generous hole, large enough to accommodate the roots and incorporate aged organic matter in the bottom. Place the peony in the prepared hole so that the eyes (small, red-colored buds) are one to two inches below the soil's surface. Backfill and water well.
Peonies may be left undisturbed for many years. A decline in flower production usually indicates overcrowding and the need for division. Carefully lift the clump and wash away the soil to expose the eyes. Using a clean, sharp tool, divide the clump into sections, each with three to five eyes and good roots. Replant immediately.
SPRING CARE: Start cultivation early. Feed Fertilizer soon after growth starts, using 1 rounded tablespoonful around each plant and cultivating it into the soil. The feeding is important since the peony plant makes a very rapid early growth and needs this complete feeding to produce foliage and blooms. For larger blooms, disbud the smaller buds on the plant, allowing only the terminal bud to develop. For quantity of flowers and a longer flowering season, leave some of the lateral buds. From white, creamy pink, raspberry to deep maroon, peonies come in many colors.

![[Digging Out Seedlings]](http://www.richters.com/OnlineSeminars/seeding/pricking.jpg)


Choose your type(s). There are three: English or garden peas (only the seeds are eaten), Chinese or snow peas (picked when the pods have reached full size but the seeds are still small and eaten pod and all), and snap peas (picked when both pod and seeds are mature; both are edible).
Sow peas directly in the garden as soon as the soil can be worked, usually about five weeks before the last expected frost. Because the seeds germinate so readily, and because you'll want to make successive plantings, there's no real advantage to buying started plants.
Plant the seeds an inch deep, 3 to 4 inches apart, in rows about 3 feet apart. Install supports for peas - even dwarf varieties - when you plant them, and start guiding the vines upward as soon as they're long enough to climb.
Plant a different, heat-resistant variety a few weeks after the first sowing. Then 8 to 10 weeks before the first frost date, plant a crop in another bed for an early autumn harvest.
Make sure young plants get about 1/2 inch of water a week (1 inch in very sandy soil). When plants begin to flower, they need an inch per week regardless of soil.
Help ensure heavy yields by feeding liquid seaweed or compost tea twice during the growing season.
Expect peas to be ready for picking about three weeks after the plants begin to flower.


Vegetable container gardening can bring joy and bounty. The simple pleasure of biting into a tomato still warm from the sun, picked and eaten on the spot, is almost unbeatable. You can grow just about any vegetable in a container garden and you can also save serious bucks by growing your own vegetable container gardens.
However, vegetable container gardening can be a frustrating and expensive endeavor if your plants don't thrive and produce. The following list of basic tips apply to most vegetables, and will help you and your plants get off to a good start.
Sun - Most vegetables need full sun – that means at least six hours of direct sunlight a day. It is easy to overestimate how much sun an area really gets, so either take out your watch and time how long the sun hits the spot where you want to put your vegetable container garden.
Water – Growing vegetables need water - lots of it. However, you don't want to drown your plants. The goal is to keep your soil moist but not wet. To figure out if your plants need water, stick your finger down into the soil, about an inch, or up to your first knuckle. If the soil feels dry, add water, and if you're not sure, wait and check later in the day. At the height of summer, you probably will have to water at least once, sometimes twice, a day. Proper watering may be the single most important and hardest part of vegetable container gardening. A water gauge that goes down to the roots is a good $6 investment.
Heat – If you live in a really hot zone you may have to shade your plants in the middle of the day in order not to fry them. Also, it's best not to use metal containers or dark colored plastics or ceramics, because they can heat up and cook your plant's roots. On the flip side, many vegetables don’t like cold soil, so make sure not to put your vegetable container gardens outside full-time, until you know the temperatures are warm enough. For many plants the soil needs to be at least 60°F. Using a meat thermometer is a good way to find out the temperature of your soil. Always make sure to harden off your plants before you put them outside. That means introduce them gradually to the elements.
Soil - Quality potting soil is really important for vegetables. Don't use soil from your garden, because it will compact in your container and won't drain water properly. Also, one of the reasons to garden in containers is so you won't have to deal with weeds. Chances are pretty good that if you use garden soil, you will be importing weeds into your container. I use organic potting soil because studies have shown that there are many benefits to growing organically, including better taste and a higher percentage of antioxidents and phytochemicals.
Fertilizer - Plants need food to thrive, and their food is fertilizer. If your soil doesn’t have fertilizer already mixed in, you’ll want to add fertilizer. I use an organic granular fertilizer and mix it into my containers from top to bottom. Every couple of weeks I will add diluted liquid fish emulsion or liquid seaweed to give them the nutrition they need. Another great way to add fertilizer during the growing season is to make or buy compost tea.
Drainage - Drainage is key to keep plants from drowning. You want your pot or container to let excess water out of the bottom, so your plants won't sit in water or soggy soil. Make sure your container has one large hole or several smaller ones. You can usually drill holes if the drainage is insufficient. To protect a deck under the pot...put a saucer under the pot to catch the drainage.
Containers – Choosing a container can be daunting. You can use almost anything for a garden planter as long as it is big enough and has good drainage. Keep in mind though, that the larger your container, the easier it will be to maintain. The more soil a container can hold the more moisture it will retain. I don’t bother with containers that are smaller than 12” and I am much happier if they are at least 18”. Bigger, really is better here.
I particularly love wooden containers for growing vegetables. I like the way they look and you can get really good-sized containers that aren’t too expensive, or you can make your own. Cedar will last just about as long as your garden does. Plastic or glazed ceramic containers are fine too. You can even use terracotta, but it is harder to keep your plants moist, because the clay tends to suck the water out of the soil. To help solve this problem, put a dish under your ceramic pot and fill it with water.
Seeds or Seedlings – You can start your veggies from seed or buy seedlings. There are some significant advantages and disadvantages to each. Starting your own seeds is much less expensive than buying seedlings, after some start up costs. If you start your own seeds can grow hard to find varieties and can also grow your seedlings organically. However, starting seeds isn't for everyone. You absolutely cannot let them dry out or they're toast. Conversely, if you give them too much water, they keel over dead. Check out the blog on starting seeds.
Building the garden
If you're a beginner to the raise bed gardening world, laying out the garden in a rectangular pattern is the way to go. Rectangular gardens are easier to maintain and to work on. No matter which design you decide on, make sure to level the area first to make a flat base for starting the project. Other things to keep in mind when you're building a raised bed garden include:
Width and length. If your raised garden bed is accessible from both sides you can make it four feet wide. If the bed is accessible only from one side, limit the width to 3 feet. Most gardeners find it uncomfortable to reach farther than 3 feet to tend the bed. The garden can really be any length suitable to your landscape, but a good workable size is about 12 feet long.
Using a frame
Although most raised bed gardens are framed, they really don't have to be. Some gardeners simply mound up soil, to make planting flowers or vegetables within area landscaping easier. However, using a frame will help keep the soil in place during heavy rains and keep the raised bed garden looking neat. You can use a variety of materials, so long as whatever you choose is sturdy and long lasting. Here are some framing ideas:

Easy access pathways
If you're building more than one raised garden bed, leave walkways in between each bed. When deciding on the width of the walkway, keep in mind that plants at the border of your garden will hang over the edge and that you may want to bring a wheel barrow or garden cart in. For foot traffic only, 1-foot wide paths are usually big enough. Also, put something down on the walkway to keep it from getting muddy. You'll need easy access to those beautiful vegetables and flowers you'll be growing!


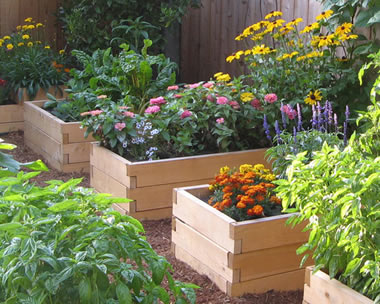
 A popular vegetable garden layout which many home gardeners choose is the raised garden bed. Raised beds are versatile, easy to use, and have many advantages over traditional gardening. For example, a raised bed allows you to easily control your soil mixtures so that you always have the proper soil for your plants. As you can customize the soil mixtures in your raised beds, you can greatly improve soil drainage for your plants. Many gardeners build raised beds just for this reason. Raising your garden bed even eight inches above the existing ground level can greatly improve drainage. I would suggest 12 inches however.
 While one of the most obvious benefits to gardening with raised beds is their adjustable height, raised beds also have numerous other benefits. For example, because raised beds are designed so that you don’t have to actually step into your raised beds for maintenance, you can produce larger quantities of fruits in vegetables in the same amount space that you’d use in a traditional garden plot.
Garden maintenance is also easy with raised beds. You can quickly and easily remove weeds and control pests in your raised beds. If you use black plastic mulch for weed control, you will use significantly less plastic for your raised beds that in a traditional garden. Moreover, rodents and other pests that like to eat your veggies in a regular garden bed will have difficulty reaching plants in raised beds. Crop rotation is also relatively painless in raised beds, which can help prevent problems with diseases that can form in the soil over time.
Watering is also easy and more efficient, as you irrigate only where plants are growing and not the walking spaces between your garden rows. Additionally, you can grow your plants closer together, which helps to shade the soil and reduces evaporation. A drip irrigation system is ideal and efficient.
You can also quickly change soil and plants in your raised beds. For example, using a raised bed makes it very easy to plant annuals in the summer and replace them with bulbs later in the growing season. If you grow vegetables or fruits, raised beds can greatly increase the growing season. Soil actually heats up quicker in raised beds and the addition of a removable plastic frame transforms your raised bed into an instant cold frame.
Raised beds can also make gardening more creative, as you can use many different kinds of materials to build you beds including beautiful hardwoods, bricks, stones, and recycled materials such as railroad ties.
Vegetables are normally planted closer together than in the row vegetable garden layout making this is an ideal choice if you only have space for a small vegetable garden. These beds need to be narrow enough so that you do not need to tread on your beds to plant, weed or harvest your veggies. A good width would be 3 to 4 feet, (.9 - 1.2 metres) if you can get at the bed from both sides. You can build raised beds out of recycled wood, bricks, concrete blocks, stones or just pile up the soil on top of the ground. A good depth would be about 8-12 inches (20-30 cm).
| Variety | Maturing | Comments |
|---|---|---|
| Yukon Gold | Early to Mid season | Large, yellow-fleshed variety. They are excellent baked, boiled, or mashed. These potatos store well. |
| Superior | Mid season | Good baked, boiled, or mashed. Resistant to potato scab. |
| Red Pontiac | Late maturing | High yields, large round potatoes, easy to grow, stores well. |
| Kennebec | Late maturing | Excellent producer, large potatoes, great for baking or frying, stores well. |
| Russet Norkotah | Late maturing | Excellent baking potato, excellent producer, large potatoes. |
| White Rose | Early to Mid season | Good producer, good for cooking, doesn't store well. |
| Russet | Mid season | Excellent producer, excellent baking potato, large potatoes, excellent for storage. |
| Norland | Early maturing | Red skin, white flesh, excellent when boiled, fried, or mashed, stores well. |
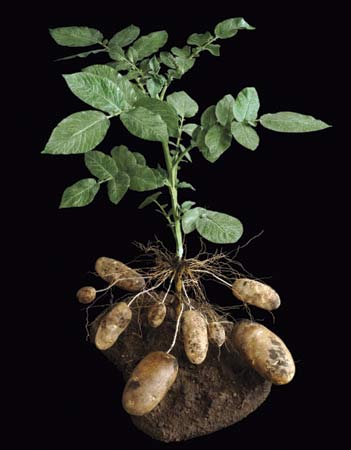
HARVESTING - New young potatoes are harvested when peas are ripe or as the potato plants begin to flower. For storage of full sized potatoes harvest them when the vines turn yellow or have died-back.
STORAGE - Keep them in the dark, in a spot where temperatures are about 40 degrees.


 Enchantment, Asiatic Lilly Enchantment, Asiatic Lilly |
| Cultivars | Type | Color | Height in Feet | Time of Bloom |
| Enchantment | Asiatic | orange | 2 - 3 | June |
| Connecticut King | Asiatic | yellow | 3 - 4 | June |
| Corsica | Asiatic | pink | 3 | June/July |
| Crete | Asiatic | deep pink | 3 - 4 | June/July |
| Dawn Star | Asiatic | cream | 2 - 3 | July |
| Black Beauty | Oriental | dark red | 5 - 6 | July/August |
| Journey's End | Oriental | deep pink | 4 - 5 | August |
| Stargazer | Oriental | crimson-red | 2 - 3 | August |
| Yellow Ribbons | Oriental | white/yellow | 3 - 5 | August |
| Casa Blanca | Oriental | pure white | 4 - 5 | August/September |
Never plant lilies where standing water collects after heavy rainfall. Well-drained soil is an absolute must or the bulbs will rot. Add lots of organic matter to clay soil to create a raised area with improved drainage. Incorporate organic matter into light, sandy soil also, to help hold onto nutrients and prevent it from drying too rapidly. Before winter, mulch over newly planted bulbs with four to six inches of loose, weed-free compost, leaves, or wood chips. This delays soil freezing and allows roots to continue growing longer. Mulch also insulates the soil against fluctuating temperatures, delaying the emergence of frost-tender shoots in spring. After lillies are established they won't need much protection....just enjoy.

 Window ledge basket!
 Sedum metal basket hanging on the gate!
 Herb wagon on the deck!
Hop into gardening by nestling small, plant-filled containers in strategic locations throughout the landscape. To create a fun seasonal look, we gave this display an Easter theme, mixing foliage, flowers, eggs, and a small rabbit statuary.
Classic Wicker
We lined our traditional Easter baskets with burlap and filled them with soil. Then we placed plants inside. To make the wicker last longer, you can leave plants in their plastic pots and arrange them in the basket. Fill in the voids between containers with moss or burlap. Take the pots out when watering, so the baskets won't stay wet.
Durable Metal
A metal basket makes an excellent, long-lasting planter. This one needed drainage holes, so we drilled a few in the bottom before planting golden club moss and hostas. Golden club moss grows flat and covers the soil like a shimmering chartreuse blanket underneath the leafy hostas. This shade-loving mix provides a medley of foliage from spring till summer.
New Life for an Old Basket
A rusted, wire-framed hanging basket makes a great planter. We removed the chains and let it rest on the ground. Then we added a coco-fiber liner and filled it with potting soil. When choosing plants, be creative and try a shrub. We put a small boxwood in the center and tucked petunias around it. Once the boxwood outgrows the space, plant it in the yard. We used variegated ivy along the outside edge of the container.
Tasty Treats
Two of the baskets contain edible greenery. One is filled with creeping thyme and topped with a large ornamental egg. The thyme's fine texture makes a nice green nest for the oversize egg. The larger basket contains chartreuse leaf lettuce mixed with chives, which have spiky, hollow foliage. Chives produce beautiful pink spring blooms. For a decorative touch, eggshells can act as pots. Crack open real eggs, wash the shells, and fill them with small sprigs of thyme.
 Since this is my Mom's favorite saying, I was happy to see this sign hanging in our friends garden! Her garden is full of raised beds, potting benches and tools in a big mailbox. And, she takes the time to explain how little chickens grow up to be big white chickens to little interested girls. Thanks Rita Babcock for your gardening inspiration!
At some point in your gardening experience, you may want to use a fertilizer to give your plants an extra boost. Unfortunately, many gardeners rely on chemical fertilizers to grow their trees, grass, flowers, fruits, and vegetables. However, there is an increasing awareness that many of the chemicals we use in our yards can over the long run negatively affect the environment and the health of our loved ones, neighbors, and pets.
Thankfully, there are a number of healthy natural and organic fertilizers available that will help you grow a lush, green garden and lawn without the use of potentially harmful chemical fertilizers.
Like traditional fertilizers, organic fertilizers show their content with three bold numbers. These numbers represent three different compounds: Nitrogen, Phosphorous, and Potash, which we can also describe with the letters N-P-K. The three numbers listed on fertilizer labels correspond to the percentage of these materials found in the fertilizer.
In addition to other properties, Nitrogen helps plant foliage to grow strong. Phosphorous helps roots and flowers grow and develop. Potassium (Potash) is important for overall plant health.Good poop, bad poop
What is good for the goose, is not always good for the gander. There are a few manures that should not be used, primarily those of meat eaters. According to Cornell University "Homeowners should not use any manure from dogs, cats, or other meat-eating animals, since there is risk of parasites or disease organisms that can be transmitted to humans."
The most common sources of manure are horses, cattle, goats, sheep, rabbits and poultry. Below is a guide showing how manures measure up, nutrient-wise. While all animal manures are good sources of organic matter and nutrients, it's impossible to make a precise analysis, mostly because bedding materials vary so much. For example, manure with straw or sawdust will have a different nitrogen composition than pure manure. But it's useful to know whether the manure you're using is rich or poor in a particular nutrient such as nitrogen.
Just like we need to eat to maintain our health, soil needs continual replenishment of its organic matter to decompose into humus. Humus helps create a rich, moisture-retaining soil and makes nutrients available to plants.
How common manures measure up
| Manure | Chicken | Diary cow | Horse | Steer | Rabbit | Sheep |
| N-P-K | 1.1 .80 .50 | .25 .15 .25 | .70 .30 .60 | .70 .30 .40 | 2.4 1.4 .60 | .70.30 .90 |
Chicken manure
Poultry manure (chicken in particular) is the richest animal manure in N-P-K. Chicken manure is considered "hot" and must be composted before adding it to the garden. Otherwise, it will burn any plants it comes in contact with.
Dairy (cow) manure
Dairy Manure may be the single most useful soil-builder around," says Ann Lovejoy, lifetime organic gardener and writer in Seattle, Washington. "Washed dairy manure from healthy cows is just about perfect for garden use; it can be used as a topdressing and for soil improvement," she adds. Dairy manure is preferable to steer manure, which has a higher salt and weed seed content. Though cow manure has low nutrient numbers, that's what makes it safe to use in unlimited quantities.
Horse manure
Horse manure is about half as rich as chicken manure, but richer in nitrogen than cow manure. And, like chicken droppings, it's considered "hot". Horse manure often contains a lot of weed seeds, which means it's a good idea to compost it using a hot composting method.
Steer manure
Steer manure is one of the old standbys, but it's not the most beloved because it often contains unwanted salts and weed seeds.

Rabbit manure
Rabbit manure is even higher in nitrogen than some poultry manures and it also contains a large amount of phosphorus--important for flower and fruit formation.
Sheep manure
Sheep manure is another "hot" manure. It is somewhat dry and very rich. Manure from sheep fed hay and grain will be more potent than manure from animals that live on pasture.
How to use manure
No matter what kind of manure you use, use it as a soil amendment, not a mulch. In other words, don't put raw manure directly on garden soils. Raw manure generally releases nitrogen compounds and ammonia which can burn plant roots, young plants and interfere with seed germination. In fact, it's recommended that all animal manure should be aged for at least 6 months. Many gardeners spread fresh manure in the fall and turn it in to the top 6 inches of soil a month before spring planting.
Space rhubarb crowns every 3 - 4 feet in rows about 3 feet apart. If planted too closely, the plants will grow smaller and less productive. You can plant in a long trench, much like asparagus, or dig individual holes. Place the crown 2 inches below the surface of the soil. Firm the soil gently and water well.
Rhubarb likes regular water, although mature plants are quite drought resistant.
Remove flower stalks as soon as they appear. Flower stalks are rounder, thicker and taller than leaf stalks. If allowed to mature and flower, the leaf stalks will be thinner.
Rhubarb does not like competition from weeds. A 2-3 inch layer of mulch will suppress weeds as well as help conserve water.
You can take a small harvest the second year. Harvest stalks that are at least 1" thick and leave the rest. During the 3rd year, you can harvest for about 1 month. After the 3rd year, you can harvest whenever there are stalks ready for picking. Plants can remain productive for 8 to 15 years, unless affected by pests or diseases.
To harvest, cut the stalks at the soil line or pull out individual stalks as needed. You can harvest the whole crop at the same time or harvest in succession over a 4-6 week period. Although the leaves are toxic, they can be used in the compost pile....the oxalic acid will dissipate in the composting process.
As the temperature warms, growth slows and may even go dormant, but will resume in fall as temperatures fall.
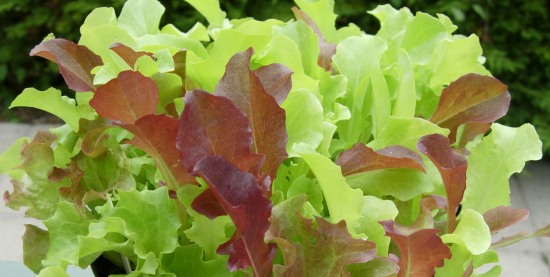
As soon as the heart has formed the lettuce plant is ready for cutting. Check for firmness by gently pressing down on the top of the heart area with the back of your hand. This is the safest way as squeezing may damage plant tissue and if the 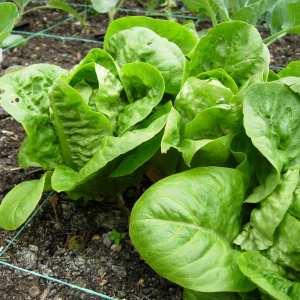 plant is not ready to pick some horrible diseases may enter, as discussed above.
If the plant is ready and left in the ground too long (5-7 days) the heart will start to grow upwards - a sure sign it is beginning to bolt. Cut them immediately for use or dig up and compost.
When cutting for use it is best to lift the whole plant, cut off the root and lower leaves, placing them on your compost heap - don`t leave on the bed to attract pests and diseases.
You should now be holding a delicious looking lettuce plant of some variety. This is the end game - after applying your knowledge of how to grow lettuce you can now go and enjoy with pride the very real fruits of your labor, there are not many thrills greater than this.


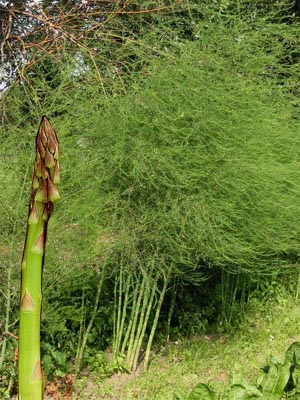
You can grow asparagus either from seeds or from crowns. Asparagus crowns are really just the base and roots of a one-year old plants. Most people find it easier to grow from crowns, which are readily available in the spring. Unlike many plants, the roots on asparagus crowns can withstand some air exposure and you will usually find them for sale loose. They should still look firm and fresh, not withered or mushy.
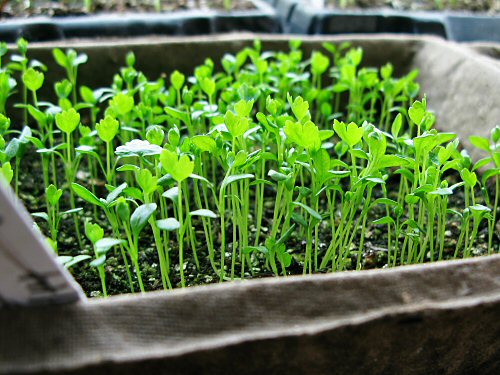
As your seedling emerges from the soil, most growers breath a big sigh of relief. Close your eyes and you can almost see the plant grow and flourish into it's full beauty, producing an enviable profusion of flowers or vegetables. As you open your eyes, you will immediately begin a new set of worries, over-nurturing the newborn indoors for a short time while the outdoor weather catches up with your dreams.
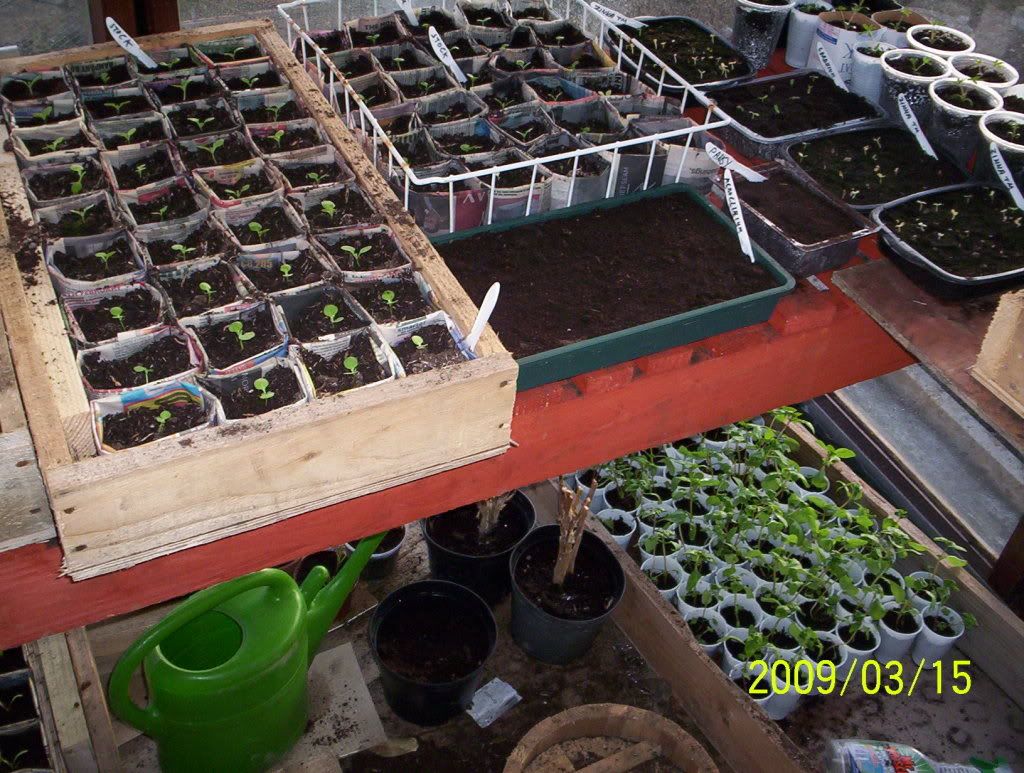
Thin Seedlings as needed- - Plants in your garden do not like to be crowded. Ditto with your seedlings, who need all the sun and nutrients that they can get.You may want to leave a few extras for a while as mortality rate of seedlings can be high.
Let there be light, and plenty of it- - As soon as the newborn seedling begins to emerge, it seeks light. Your newborn needs as much and as direct a light source as possible. Placing it by a window with a southern exposure is the first step. But this alone may not prove to be enough for the seedling to grow healthy and strong. First, the sun is not up as long in the spring as it is in the summer. Second, there are many rainy spring days with little or no direct sun. You should also acquire an artificial Grow Light and place the seedlings under it on cloudy days and at night.
Let There be Water, in just the right amount- - Provide water to your seedling every couple of days. Do not soak the soil each night. Overly wet soil encourages the development of damping off disease. Let the soil dry out a little on the top, then water thoroughly. Watering from the bottom is preferred. If you have a seed tray, add water to the bottom of the tray . The soil will absorb it through the bottom holes in your container...your container does have holes in the bottom, doesn't it!?!
Feed me, feed me- - The seedling does not need a lot of extra nutrients in it's first few days of life. Your soil starting mix usually comes with a balanced formula of nutrients that the seedlings need. After several days, adding a little liquid fertilizer to the water is helpful, but you do not need to give it full strength.
If the roots begin to come out the bottom of the pot, it is time to plant your seedling outdoors, weather permitting. If it is still too cool, keep the bottom of the tray moist, or put some extra soil in the bottom of the tray. Or, transplant seedlings to a larger pot. Most plants do not like to be root bound.
Guard against Leggy Plants- - Seedlings are leggy when their main stem or stalk grows tall and thin and can hardly support the leaf structure. It is caused by insufficient sunlight and a sheltered environment. Indoors, they do not experience the effect of wind, and do not need to develop structure to defend against it. Most seedlings do not even experience a slight breeze. When transplanted outdoors, "leggy" plants can be damaged or broken by the wind.
Tip: Take your hand,or a couple sheets of newspaper and fan the plants a few times a day. You can even lightly brush the tops of the plants, brushing back and forth in varying directions. You may notice the plants seem to slow down for a period. What they are really doing is building a stronger stem or stalk.
Those of us who have grown seedling indoors for any number of years know what "Damping Off" disease. This is a white mold that forms in the top of the soil. Damping Off disease flourishes in cold, wet damp weather along with little sunshine. It quickly spreads across the soil and wilts the seedling. Take it's habitat away, and the disease can not survive. Plants on the other hand, love just the opposite conditions. The more you make conditions ideal for your plants, the more likely you will avoid Damping Off Disease and other mold and fungal problems.
If you do experience problems, do not give up hope. Here are some things you can do to minimize or eliminate disease problems:
First, get the plant in direct sunlight if at all possible.
Stop watering until the surface is very dry.
Water only from the bottom.
Scrape as much of the mold off the soil as possible.
Stir the top of the soil without disturbing the roots. It will also speed drying.
Add some soil, although this may or may not produce results.
Increase room air circulation. You can gently blow air on your plant trays with a small fan.

 Flower fragrance is food for the soul


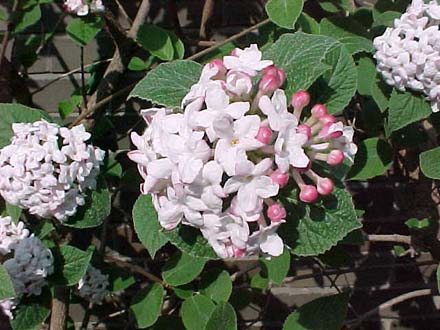
Korean Spice Virbirnum
Lilacs  In our everyday life, the average human draws 23,000 breaths a day. Included in every breath are the scents of our immediate surroundings, relaying a myriad of information. It is in this spirit that we plant our gardens with fragrant plants. The well planned fragrance garden provides a palette of scent....a "buffet" for the nose. In that same spirit, we should not lean solely on the flowers for the fragrance in our garden. The pungence of artemesia or the tang of lemon thyme can be perfect counterpoints for the spicy odor of flowers. Boxwood can not only define the border of the garden; it can be the canvas for a complex painting of aromas. Finally, the garden should not lack fragrance at any time of year. Even our garden chores can provide us with memory provoking scents. In the fall, the scent of burning leaves accompanies our annual clean up, and the smell of apples and pumpkins remind us of Thanksgivings past. In the winter, the smell of cut evergreens defines the Christmas holiday as surely as snow or Santa, and as the season progresses, forced paperwhites or hyacinths can herald the approach of spring.


